Jan 28 2014
New Banner

Comments Off on New Banner

Jan 27 2014
So it’s the end of January, and I have not posted at all on my blog. Doh! One of my new years resolutions was that I would try to do so more. Better late than never, right?
Another resolution I made was to make more jewelry. Not only MAKE it — but POST it. Post it on my flickr account, here on my blog, up on my site for sale… just get it OUT THERE! I have a lot of what I call.. UFOs. UnFinished Objects. Some of them are dangerously close to being done, if only I would do it.
So along with this vein, I joined a flickr group challenge called 3xR 2014. The challenge is to, “Reduce, Reuse and Recycle all the crap we have laying around on our benches and in our studios! Finish all those projects, use those stones we’ve been hoarding, take a look at that old sketchbook. Nothing is off limits here. Make as much work or as little as you choose but you need to Use What You Have.”
I also joined in conjunction, a flickr challenge group called THAW2014 – which stands for Thing A Week – I think both of these challenges will be great for me.
This is perfect for me. I have a LOT of material to work with, if only I would sit down and do it. For myself, I am including taking some of these UFOs and getting them finished. My goal is to do at least 1 a week. Since buying a kiln last year, I have slowing been building up my collection of enamels, and want to move into that direction.
So enough with the jibber jab! I actually HAVE ben making a piece a week — but they’ve sat on my bench instead of beign shared with the world. Which is part of the challenge to myself — POST THEM! So here is my first week’s piece.
It started with a sample I made in a fold forming class I took last year with Ira Sherman. I had so much fun in that class, I was determined to come home and make fold forming my life’s work (it always goes like that after a workshop!)
I choose one of these two forms:
I annealed it, and pickled it, to get off all the black oxides. Enamel needs a clean surface or the glass particles won’t fuse to the copper. The metal was initially rolled through a rolling mill with a piece of pattered paper, which caused the pattern to imprint on the metal. The hammer marks on one side of the leaf are also quite visible, so I opted to go with transparent enamel on the front. Green transparent, and a clear transparent.
You can see the imprinted pattern underneath the green enamel. I love the clear enamel too — it makes a shimmery golden surface with the copper underneath.
On the opposite side, I decided on a punch of color. Bright orange, with a very subtle lighter orange through the middle of the leaf.
Enamel is sifted onto the metal dry. You can see faint lines where I drew through the enamel to reveal the base orange color underneath. This technique (scratching through one layer to see underneath) is called sgraffito.
Overall, I am so happy with this piece. I kind of wish I had done more with the setting rather than just attaching it to the chain with jump rings, but time wasn’t on my side this time.
I have the other pieces I did this month as well — so that will help me to post again later this week!
Amy
Dec 18 2013
This year our very old camcorder died. Probably right in the middle of me doing some video tutorial. But as soon as it died, my heart screamed, “NOOOOOOOOOO!” because it takes those miniDV tapes and there was a whole box of those tapes waiting to be transferred from tape to computer. How does one transfer miniDV tapes to the computer you ask? Oh, by inserting them into your camcorder and plugging it into your computer and letting windows slowly (real time) play them and record them into files on your desktop! In order to do this though — that’s right — you MUST have the camcorder.
Had I done any of that? Why no of course not! There’s always tomorrow to do that sort of thing!
Once the ability to move those tapes to a digital form had been removed, I desperately wanted to watch EVERY SINGLE ONE OF THEM, of course. I debating looking on craigslist for a cheap minidv camcorder, but ended up borrowing one from a friend for the weekend, and spent it going over every 90 minutes switching to a new tape.
I ended up sitting and watching quite a bit of our kids when they were wee little tykes, playing, interacting, being ADORABLE. It made me realize that those days of wonder around Christmas are nearly at an end. OK, it kind of IS at an end for the boy child — he’s 11, and way too cool for excitement around decorating the tree, making gingerbread houses, and general Christmasy merriment. It’s not that he doesn’t want a tree, or want gingerbread cookies — it’s just that he’s MUCH too old to show ANY sort of childish glee in doing these things.
Jocelyn the 9 year old is still got a bit of it. OK, a lot of it. She loves helping me make gingerbread, pestered me to “let’s decorate the tree NOW” and is generally up for any crafty (let’s face it, Christmas can be a super crafty holiday) endeavor.
I’m hoping we get to keep some of the wonder of Christmas this year — and hopefully for a few more years to come — crossing my fingers that Christmas never becomes blase in this household. If it does.. at least I can watch our home movies of Christmas when they were 3 and 5, completely wide eyed and jumping up and down with Christmas excitement.

Jocelyn at 4 years old, Christmas 2006

Ethan at 6 years old, Christmas 2006
Dec 04 2013
I get asked this question alot — especially on the hammered copper stacking rings that I make:

And I gotta say, YES, turning your skin green is a distinct possibility when you wear raw copper – it depends on your body chemistry whether it will or not. However, I have found that it doesn’t turn your skin green forever — it may do so for a week or two, and then it stops — I’m not sure why — it could be that the body’s pH changes after consistent contact with the copper.
Also, in the pro-raw-copper column, many people rave about healing or helpful properties of raw copper. Now, I am a skeptic at heart (show me the data! where are the blind studies?!) (there are none!) so I don’t actually hold with this, but many people purchase the raw copper jewelry because of potential helpful properties that come from direct contact skin-to-copper, one I know off the top of my head is for arthritis — again, I don’t really believe any of it, but you could google for more info if you are interested.
A barrier between the copper and your skin can prevent any greenish smudge — one cheap way to do so would be to apply clear nail polish on the inside of the ring. However, it won’t last long — even with professional lacquers and such, the constant skin contact makes any blocking affect these have to be brief. This is why I don’t do it — also because I have lots of customers who WANT the copper to skin contact with no barrier.
If you want to be sure of no green skin completely, I’d stick with sterling or gold filled. Personally, I wear my copper ring all the time, and it’s been so long I don’t get any green fingers anymore.
CLEANING COPPER
Rings generally don’t need a lot of polishing, any tarnish is cleaned up by the rubbing against your skin. Bracelets, necklaces, pendants can be a different story. If you prefer a bright almost pink glow to your copper, rather than an old coppery penny look, it’s easy to clean.
My favorite way is with ketchup – mostly because with children under the age of 12 in the house, we have plenty of it! A quick dunk in ketchup for a few minutes will get rid of any tarnish.
Another way is with lemon juice (vinegar works too) and a bit of salt (1 teaspoon is plenty) in a small jar or tupperware. Place your jewelry in, making sure it’s covered, and let sit for a minute or two. VERY IMPORTANT — it only needs a minute or two — don’t walk away for a half hour — or even 5 minutes. The acid in the lemon juice which cleans away the tarnish, can also damage the surface of the metal.
Rinse and dry VERY well, and buff it up with a cloth. If the cloth doesn’t shine it up enough to your liking, you can rub with salt or baking powder to bring up the shine as well.
I hope this helps answer any questions about copper jewelry!
-Amy
Nov 03 2013
I’ve had this one on my computer for a while, but my computer is so slooooowww that it took me a while to get up the patience to edit it. Here it is! Celtic Visions Star Pendant!
In other super good news, I got a new camcorder, so hopefully from here on out, the video quality will improve!
Sep 11 2013
Me: What will we DO WITHOUT DADDY FOR ONE WHOLE WEEK!
Ethan: Eh. We’ll get by.
Comments Off on funny ethan comment
Jun 24 2013
I am not a draw-er, or a doodler, or even very artsy. I used to paint long ago, very abstract things that just made me happy. I picked up zentangle recently and am totally in love. I still am not sure if I’m even doing it right, but the rule to most doodling is, “there are no mistakes!” which is a rule I can embrace wholeheartedly!
Here are my first zentangles — I’ve been drawn to the mandala, or “zendala” circular tiles primarily, although the last one I did on a normal tile.
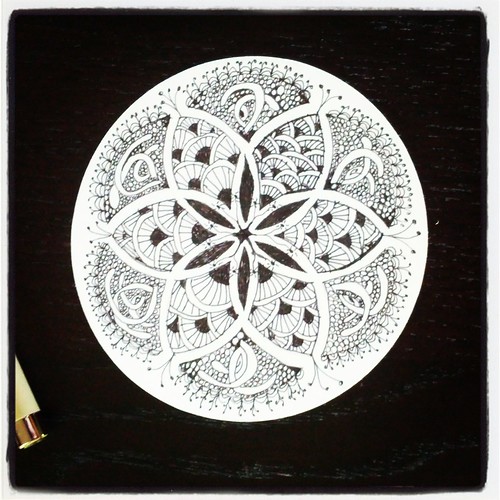
My very first zentangle! Overall, fairly pleased with this. I fiddled around with something in the very middle which I wish I hadn’t done. Stark white would have been better there.
Comments Off on Zentangle
Jun 22 2013
I wrote a lot of words… about rearranging my studio and my new height adjustable bench. If you don’t want to read it all, there are some cute kid pictures and a video – just scroll down!
Now for all the blather blather… It seems like as SOON as I get my studio set up in a functional manner that I’m happy with, something comes along to SCREW IT ALL UP!
My studio is a small room on the main level of our house, which was called a “bedroom” when we bought the house, but really is an office. The room has to serve several functions – our family computer sits on an Ikea desktop with 2 drawer units (which I LOVE, SO much space!), which the kids use daily for homework and playing. It’s my main computer as well for printing packing slips and shipping labels, as well as daily email, etc. A second Ikea desktop, solid wood, sanded and then lacquered by me is my main bench for cutting & bagging jump rings, and filing orders.
It works very well for 80% of what I do, but a traditional jeweler’s bench has a higher surface (as they say in Cougartown, about boob-high!) with a cutout for a bench pin, and a drawer underneath for catching filings, etc.
So when I wanted to do some metalwork — especially piercing, which requires sawing on the support of a bench pin, I was lowering my chair way down, and then hunching over my bench pin trying to saw things out — not extremely ergonomic or convenient. And any dust or filings just fell on the floor.
Continue Reading »
Comments Off on Studio Rearrange Take 439! Height Adjustable BENCH!
Jun 21 2013
… finally! The old one said winter 2012-13 — and it’s hot and JUNE! Jeepers, Amy, get on it!
Since I’m reorganizing my studio, I thought this banner showing how MESSY my bench can get is somewhat suitable.
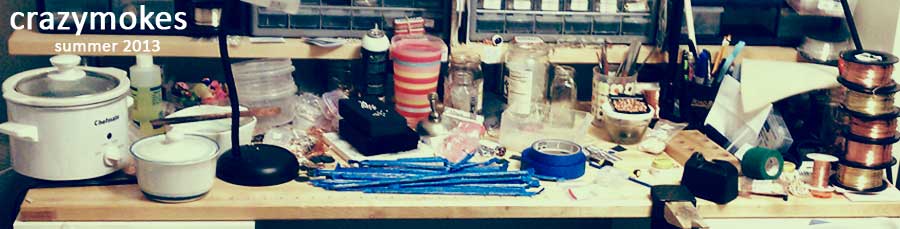
Here’s all the things I can see in this banner:
pickle pot, container of water for quenching, bottle of flux, copper tongs, lamp, charcoal soldering block (with rings on it to solder), cannister of butane, glass, scrap jars, third hand, fresh cut coils of jump rings wrapped in blue painters tape, blue painters tape, scale, bench pin, electronic torch lighter/sparker, carmex, cup of brushes, tweezers, tongs, dividers, scribes, cup of pens/markers, empty pliers board, green finger tape, packing slips, wire wire and more spools of wire.
All I can think of when looking at this banner is, “OMG the pickle pot is going to fall off!”
Comments Off on New BANNER
Apr 14 2013
In this video I show how to make the Celtic Visions chainmaille weave:

I also have a written/photo tutorial for this here. Sometimes it’s nice to see a video though, so here you go!
Please let me know what you think!